---
title: Streaming Camera Installation Guide – Padel
description: Learn how to mount your Wingfield streaming camera on a padel court and align it correctly, with three mounting options for any cage setup.
image: https://help.wingfield.io/hubfs/Preview%20Images/headerStreaming.jpg
---
[Skip to content](https://help.wingfield.io/en/streaming-camera/mount-padel#main-content)
- [English](https://help.wingfield.io/en/streaming-camera/mount-padel)
- [Deutsch](https://help.wingfield.io/streaming-camera/mount-padel)
English
Show submenu for translations
[](https://help.wingfield.io/en?hsLang=en)
Open main navigation
Close main navigation
- - [English](https://help.wingfield.io/en/streaming-camera/mount-padel)
- [Deutsch](https://help.wingfield.io/streaming-camera/mount-padel)
English
Show submenu for translations
- [Contact us](mailto:service@my-wingfield.com)
[Contact us](mailto:service@my-wingfield.com)
Hey! How can we help you?
- There are no suggestions because the search field is empty.
1. [Wingfield Help Center](https://help.wingfield.io/en?hsLang=en)
2. [Installation](https://help.wingfield.io/en/installation?hsLang=en)
3. [Installation Guide - Streaming Camera](https://help.wingfield.io/en/installation?hsLang=en#installation-guide-streaming-camera)
October 9, 2026
# Streaming Camera Installation Guide – Padel
## Learn how to mount your Wingfield streaming camera (HD or 4K) on a padel court and align it correctly, with three mounting options for any cage setup.
**These installation instructions apply to the following system types:**
- **✔ Wingfield Cam+**
- **✔ Wingfield AI Pro**
**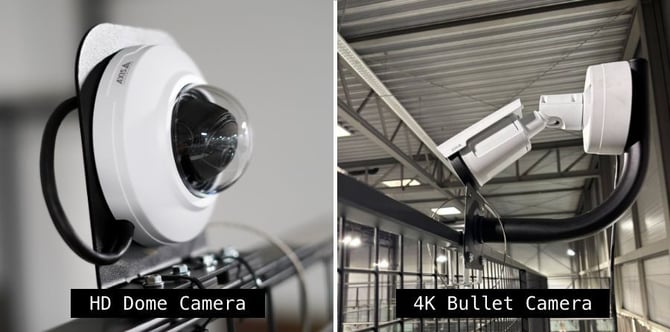**
The Wingfield streaming camera delivers the live video stream of your match and is separate from the Dual Camera Module (only Wingfield AI Pro setup), which handles tracking. This guide covers different mounting options for different setups.
**In this article, you’ll learn:**
- ✔ Where to find your MAC address or S/N number of you camera (**🔗 [Quick Link](https://help.wingfield.io/en/streaming-camera/mount-padel#mac-address)**)
- ✔ Where to best mount your camera (🔗**[Quick Link](https://help.wingfield.io/en/streaming-camera/mount-padel#placement)**)
- ✔ Which mounting options are available for our HD and 4K cameras (🔗[**Quick Link**](https://help.wingfield.io/en/streaming-camera/mount-padel#mounting-options))
### Before you start: Note your MAC address
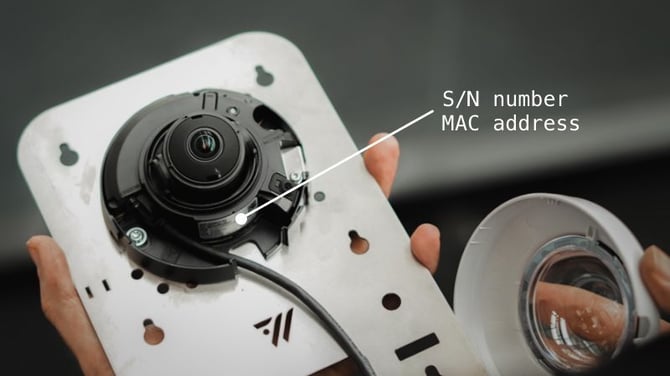
Before you start mounting, note down your camera's S/N number or MAC address — which one depends on your camera model.
1. Carefully *detach the glass dome* from the camera.
2. You'll find the *SN number or MAC address* on the label inside the camera.
3. *Write it down or take a photo* — you'll need it later during the configuration step.
### Where to place your Streaming Camera
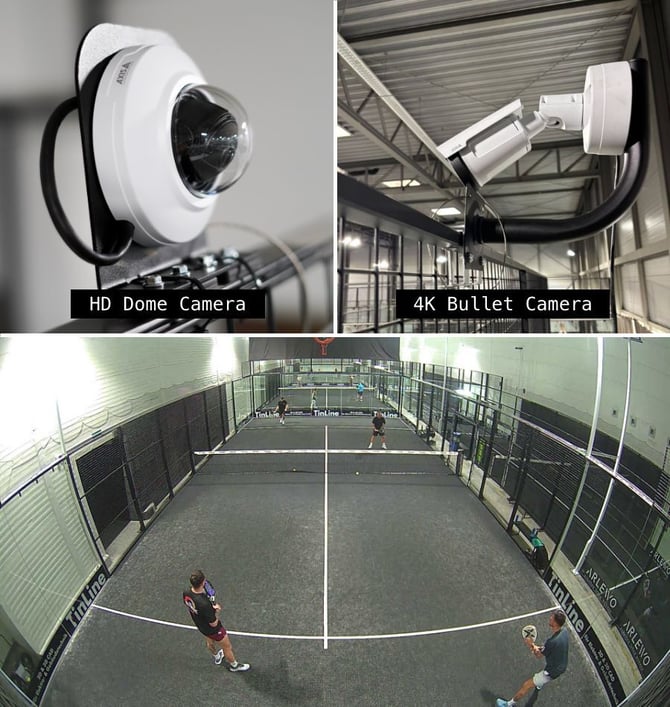
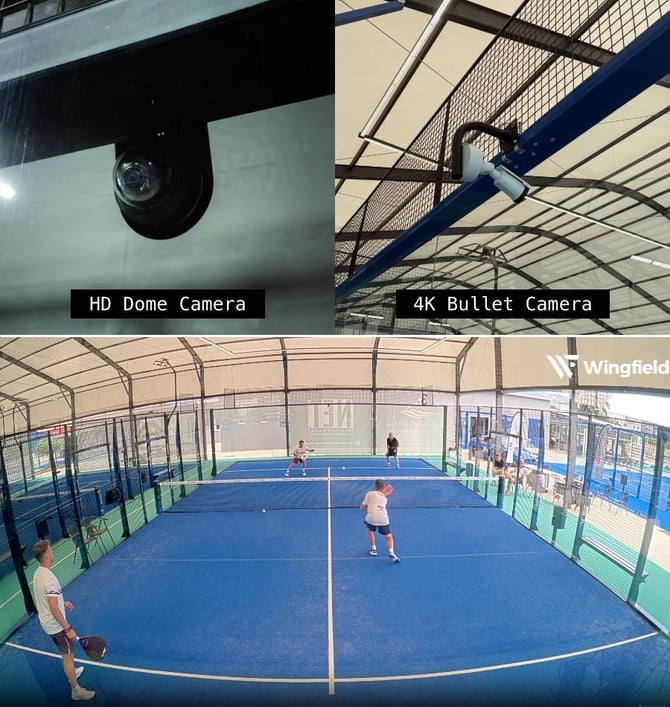
The streaming camera can basically be placed wherever it gives you the best view of your court. We provide mounting options for a standard installation — but depending on your desired perspective, the camera model (1080p vs. 4k) and what your individual conditions allow, you can be creative. Below, we show you two options for standard mounting directly on the court.
**a) On top of the crossbar / on top of the fence** – bird's-eye view from above .
**b) Below the middle crossbar** – for a close-up view from a lower position through the glass.
### Mounting options for your Streaming Camera on a padel court
☝🏻 **By the way:** We usually provide different mounting options. Choose the one that works best for your individual court setup.
| **Screw clamps** (standard for our 4K Bullet Cam) *see instructions below* ⬇️ | **No drilling needed — this option may not work for bars that exceed standard dimensions.** Measure your bar's diameter beforehand if you're unsure. |
| --- | --- |
| **Magnets** (standard for our HD Dome Cam) *see instructions below* ⬇️ | **Very flexible — works with any bar width.** Secure the camera with additional cable ties for extra safety. |
| **Direct screw-in** | **Permanent, long-term installation.** Mount directly to the padel cage, a wall, or another suitable structure behind the court. |
#### Standard mounting HD Dome camera (magnetic attachment)
**⚠️ Caution:** The magnets are extremely strong. Do not let them snap together.
**💡 Tip:** We recommend completing steps 1–5 on the ground and only climbing the ladder from step 6 onwards.
1. **Attach the camera to the camera mounting plate** using two M4 screws and nuts**.**
2. **Attach the magnets to the camera mounting plate.** Put the nuts to the four screws on the magnets and tighten them securely.
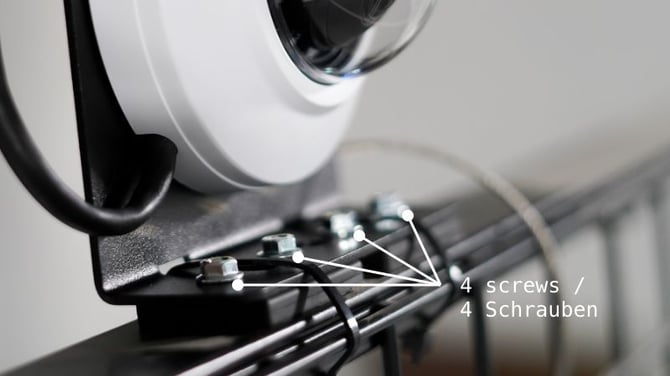
3. **Remove the glass dome** and connect the LAN cable to the camera.
4. **Add strain relief for the LAN cable.** Run a cable tie through the two small slots in the mounting plate and secure the LAN cable. Do not fully tighten the cable tie yet — leave enough flexibility to adjust the cable length when positioning the camera and tighten it in step 8.
#### 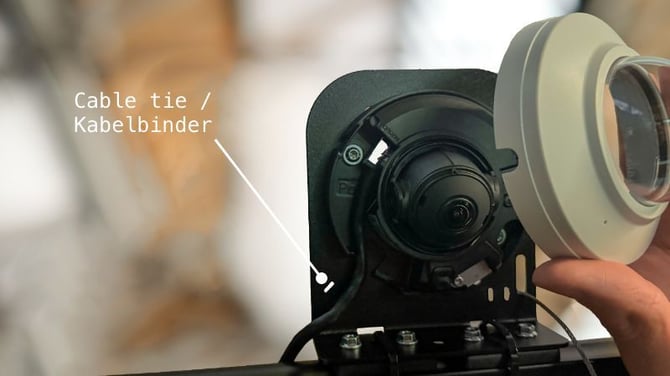
5. **Reattach the glass dome** (feed the LAN cable through the small opening in the dome).
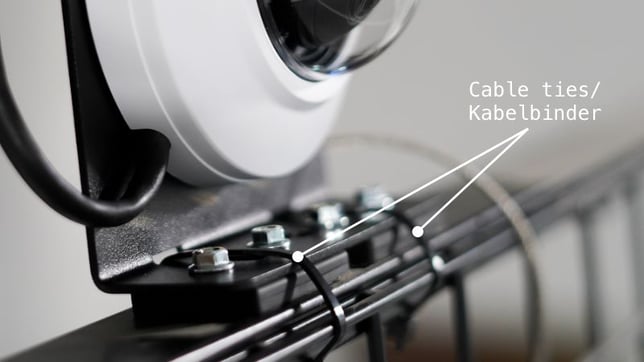
6. **Position and secure the camera.** Once you have found the final camera position, run two cable ties through the designated slots and around the court’s crossbar to provide additional security for the magnetic mount.
#### 
7. **Attach the safety wire.** Run the wire loop through the larger hole in the mounting plate and around the court’s crossbar. This acts as an additional safety measure in case both the magnets and cable ties fail.
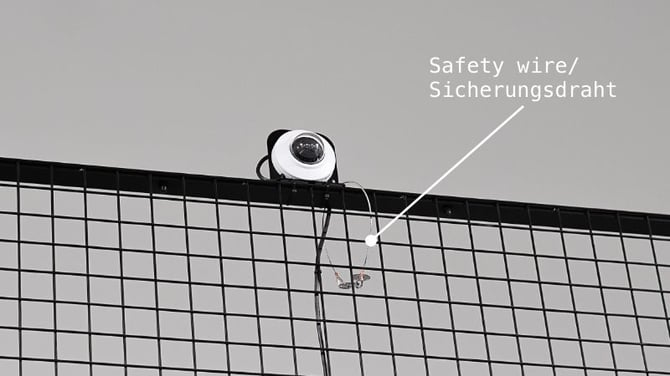
8. **Tighten the strain relief.** Once the camera is in its final position and you have confirmed the required cable length, fully tighten the cable tie securing the LAN cable.
#### Standard mounting 4K Bullet camera (screw clamps)
Start by assembling the 4K camera mounting arm. The camera is normally delivered unassembled, allowing you to take a picture the **MAC address / serial number (S/N)** before installation.
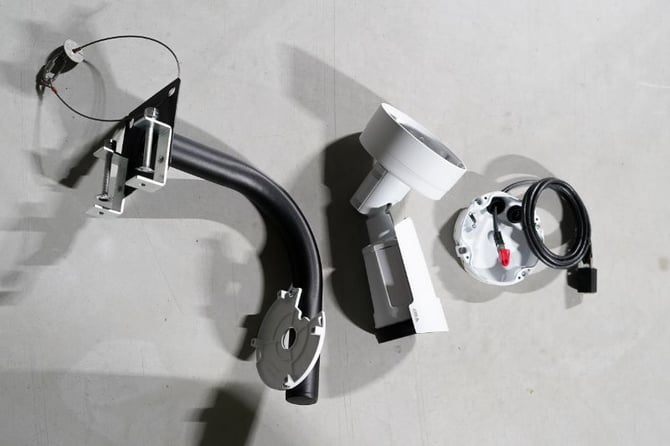
1. **Attach the camera mount:** Feed the Ethernet cable through the opening of the camera mount's middle part (piece on the right - see picture above). Then attach the part to the mounting arm using the 4 provided screws.
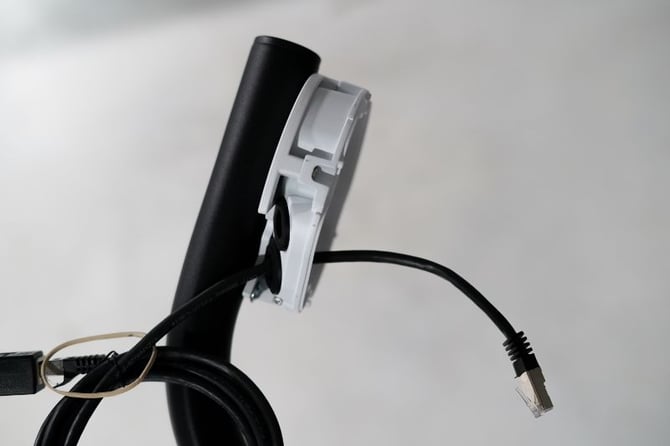
2. **Attach the 4K camera:** Mount the camera to the camera mount and secure it using the remaining 4 screws.
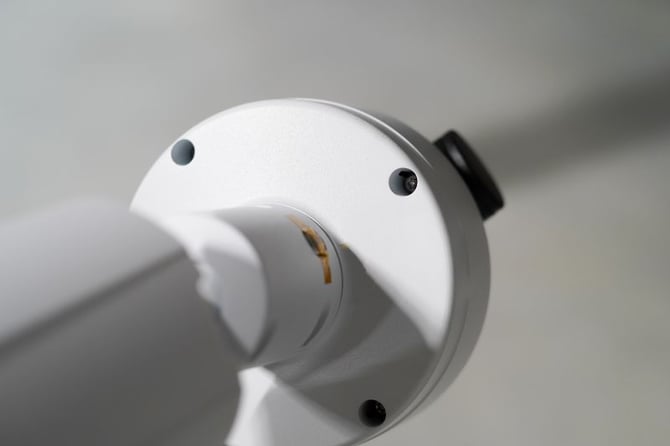
You can now attach the assembled camera and mounting arm to the padel cage. The camera can be installed either on top of the upper crossbar or behind the glass in an upside-down position.
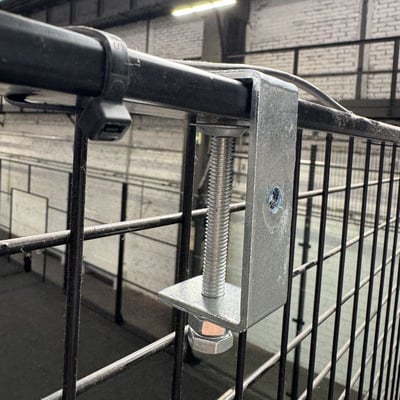
1. **Attach the clamps:** Position the screw clamps around the crossbar of the padel cage and tighten the clamp screws securely.
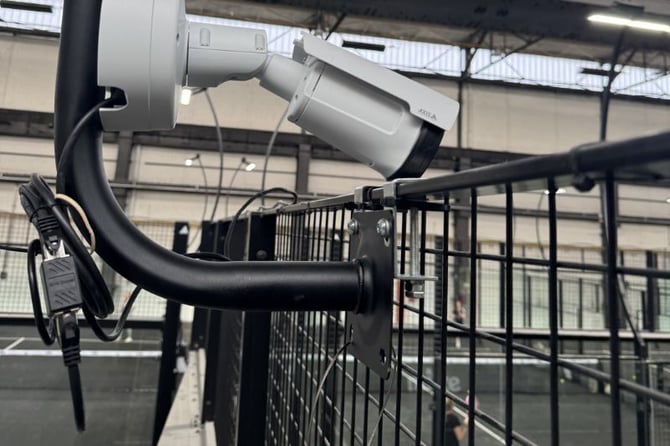
**⚠️ Caution**: Make sure the nut is fully tightened against the lock washer so the connection is securely locked in place.
1. **Secure the center nut:** Tighten the center nut firmly against the **lock washer** using a wrench or torque wrench.
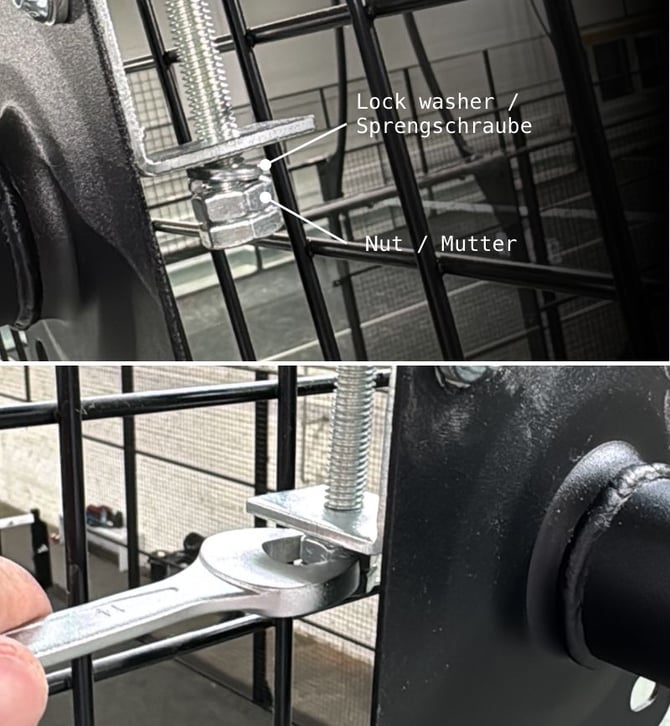
**⚠️ Caution**: Make sure the nut is fully tightened against the lock washer so the connection is securely locked in place.
**💡 Tip:** If there is not enough space between the fence and the camera mount to tighten the nut with a wrench or torque wrench, first remove the camera mount from the two clamps. Secure and tighten the clamps separately, then reattach the camera mount.
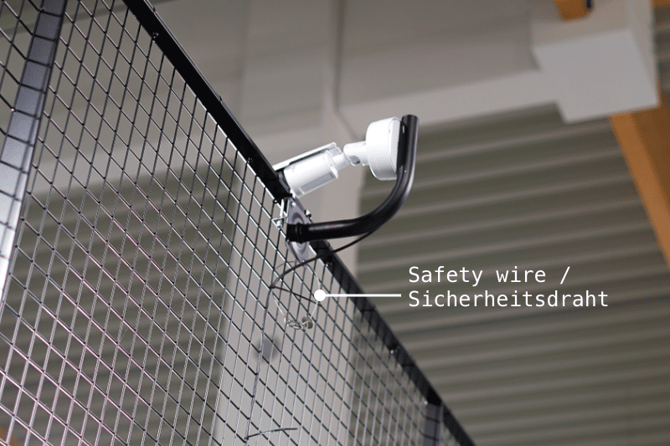
1. **Attach the safety wire.** Run the wire loop through the larger hole in the mounting plate and around the court’s crossbar. This acts as an additional safety measure in case both the magnets and cable ties fail.
#### Connecting & Routing the network cable
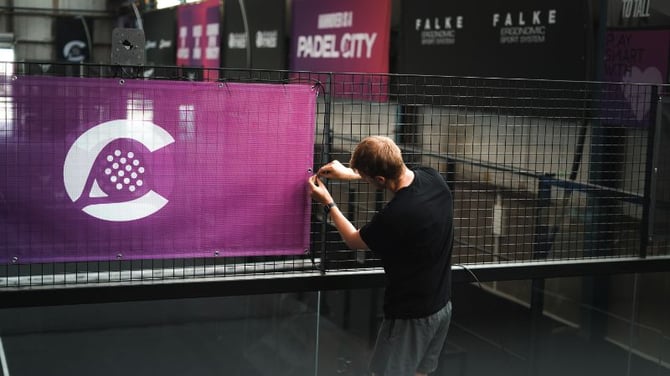
Run the **20 m network cable** from the camera to the **PoE switch**, typically installed behind the screen.
1. **Plan the cable route:** Decide whether to start at the camera or the screen. Check where any excess cable can be neatly stored.
**💡Tip:** We recommend routing the cable along the top of the cage. If possible, use existing cable trays installed for the court lighting.
1. **Loosely secure the cable:** Attach the cable to the cage with cable ties every few meters. Do not fully tighten them yet, so you can still adjust the cable.
2. **Finalize the cable run:** Once the cable is positioned correctly, neatly coil and secure any excess cable. Add more cable ties where needed and tighten all ties.
3. **Trim the cable ties:** Cut off the excess ends using the provided cutting pliers.

**⚠️ Caution:** For outdoor installations, attach the waterproof connector to the Ethernet cable that connects to the Streaming Camera. The matching part of the connector should already be attached to the Streaming Camera.
#### What's Next?
To complete the Streaming Camera setup, continue with the Streaming Camera Configuration article.
- [➡️ **Streaming Camera Configuration**](https://help.wingfield.io/en/streaming-camera/configuration?hsLang=en)
**⚠️ Caution:** The court terminal must already be installed and powered on before you can proceed with the configuration.
### Stuck on-site and not sure what to do next? We've got you covered!
**📞 Service hotline: 🇺🇸** [+1 929 395 1078](tel:+19293951078) | 🇪🇺 [+49 511 51525901](tel:+4951151525901)
**💬 WhatsApp:** [click here](https://wa.me/message/IZ2CTUJIXCGZK1)
**📨 E-Mail:** [service@wingfield.io](mailto:service@wingfield.io)
- [First steps with Wingfield](https://help.wingfield.io/en/first-steps-with-wingfield?hsLang=en#main-content)
- [Before Your First Wingfield Session](https://help.wingfield.io/en/first-steps-with-wingfield?hsLang=en#before-your-first-wingfield-session)
- [On the court](https://help.wingfield.io/en/first-steps-with-wingfield?hsLang=en#on-the-court)
- [About the Wingfield app](https://help.wingfield.io/en/about-the-wingfield-app?hsLang=en#main-content)
- [👤 Account & roles](https://help.wingfield.io/en/about-the-wingfield-app?hsLang=en#account-roles)
- [💬 App FAQ's](https://help.wingfield.io/en/about-the-wingfield-app?hsLang=en#app-faqs)
- [📲 Updates](https://help.wingfield.io/en/about-the-wingfield-app?hsLang=en#updates)
- [DUPR](https://help.wingfield.io/en/about-the-wingfield-app?hsLang=en#dupr)
- [Installation](https://help.wingfield.io/en/installation?hsLang=en#main-content)
- [Preparations](https://help.wingfield.io/en/installation?hsLang=en#preparations)
- [Installation Guide - Streaming Camera](https://help.wingfield.io/en/installation?hsLang=en#installation-guide-streaming-camera)
- [Installation Guide - Court Terminal](https://help.wingfield.io/en/installation?hsLang=en#installation-guide-court-terminal)
- [Installation Guide - Dual Tracking Camera](https://help.wingfield.io/en/installation?hsLang=en#installation-guide-dual-tracking-camera)
- [Troubleshooting](https://help.wingfield.io/en/installation?hsLang=en#troubleshooting)
- [Maintenance & Upgrades](https://help.wingfield.io/en/installation?hsLang=en#maintenance-upgrades)
- [Installation Guide Wingfield Box (Tennis)](https://help.wingfield.io/en/installation?hsLang=en#installation-guide-wingfield-box-tennis)
- [Installation Guide Wingfield Box (Pickleball)](https://help.wingfield.io/en/installation?hsLang=en#installation-guide-wingfield-box-pickleball)
- [Coach Corner](https://help.wingfield.io/en/coach-corner?hsLang=en#main-content)
- [Tools for coaches](https://help.wingfield.io/en/coach-corner?hsLang=en#tools-for-coaches)
- [Coaching with Wingfield](https://help.wingfield.io/en/coach-corner?hsLang=en#coaching-with-wingfield)
- [Blueprints for Drills](https://help.wingfield.io/en/coach-corner?hsLang=en#blueprints-for-drills)
- [Club resources](https://help.wingfield.io/en/club-resources?hsLang=en#main-content)
- [Financing & refinancing](https://help.wingfield.io/en/club-resources?hsLang=en#financing-refinancing)
- [Marketing](https://help.wingfield.io/en/club-resources?hsLang=en#marketing)
- [Admin dashboard](https://help.wingfield.io/en/club-resources?hsLang=en#admin-dashboard)
- [Operations](https://help.wingfield.io/en/club-resources?hsLang=en#operations)
- [DTB LK-Matches](https://help.wingfield.io/en/dtb-lk-matches?hsLang=en#main-content)
- [Basics](https://help.wingfield.io/en/dtb-lk-matches?hsLang=en#basics)
- [DTB rules](https://help.wingfield.io/en/dtb-lk-matches?hsLang=en#dtb-rules)
- [Match validation](https://help.wingfield.io/en/dtb-lk-matches?hsLang=en#match-validation)
- [Marketing tips for clubs](https://help.wingfield.io/en/dtb-lk-matches?hsLang=en#marketing-tips-for-clubs)
- [FAQ](https://help.wingfield.io/en/faq?hsLang=en)
- [Campaigns](https://help.wingfield.io/en/campaigns?hsLang=en)
- [General](https://help.wingfield.io/en/general?hsLang=en)
[](https://help.wingfield.io/?hsLang=en)
Copyright © 2025, © Wingfield GmbH