3.0 Pickleball: Dome Camera configuration
Learn how to get your Dome Camera up and running.

Before you finally mount your Dome Camera, we recommend to configure it with the Wingfield Box first. In the configuration mode, you can display a live image of the camera on the Wingfield Box which helps you a lot to find the optimal mounting position.
👣 Step 1 | Connect the switch to the Dome Camera
| 🛠️ In this step you need: |
| Dome Camera |
| LAN cable |
| Wingfield Box |
- 1️⃣ Connect the switch and your Dome Camera with the supplied LAN cable.
- 2️⃣ Once again, make sure that all cables in the router, switch, Dome Camera and Wingfield Box are plugged in correctly. You should be able to see the online status of your Wingfield Box on the display.

⚠️ Attention: If you have previously connected your Wingfield Box to your network via WIFI, you may have to adjust the network settings to LAN again in the configuration mode.
👣 Step 2 | Configure the Dome Camera

⚠️ Attention: Always install your Wingfield Box before proceeding with the setup of your Dome Camera. If you have already set up your Wingfield Box, it will still be in configuration mode. To configure the Dome Camera, your Wingfield Box must be connected to the Internet.

- 1️⃣ In configuration mode, click on Configure Dome Camera
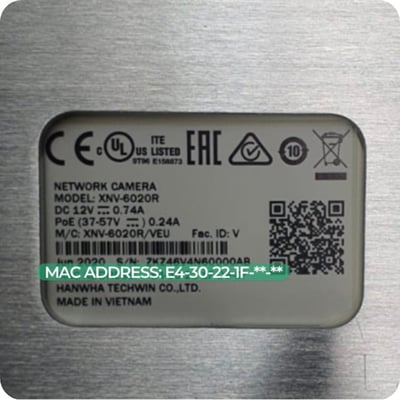
- 2️⃣ Enter the MAC address of your camera in the input field (you will find it on the back of your camera).

💡Tip: We recommend taking a picture of the camera's MAC address before mounting it. If you ever need to reconfigure the Dome Camera, you do not have to unmount it again.
☝🏼 By the way: It is not a problem if you have to disconnect the camera's LAN connection again before its final installation. Once the Dome Camera has been found in the network, you can simply click on Reconnect (see picture).

As soon as your Dome Camera has been successfully connected, you can display its live image on the Wingfield Box. You can now continue with the last step of the installation:
- 1️⃣ Dome Camera Configuration ✔️
- 2️⃣ Mounting the Dome Camera
➡️ Continue with: Mounting the Dome Camera
You're on the court and don't know what to do? We are here for you!
📞 Service hotline: +1 929 395 1078💬 WhatsApp: click here
📨 E-Mail: service@wingfield.io

