
Cool that you've chosen Wingfield AI Pro! To make sure your installation goes smoothly, this article walks you through all the important steps.
In this article, you'll learn:
-
✔ What are the technical requirements? (🔗 Quick Link)
-
✔ What does the wiring look like? (🔗 Quick Link)
-
✔ What's included in the scope of delivery? (🔗 Quick Link)
-
✔ What do the installation steps look like for the different sports? (🔗 Quick Link)
What components make up Wingfield AI Pro?
This video shows an example setup of a Wingfield AI Pro system for pickleball.
Your Wingfield AI Pro system consists of three main components that together enable Live Tracking, stats, and video highlights. You'll find a detailed breakdown of the scope of delivery further down in this article:
- Court Terminal – the central computing unit with a 24" touchscreen, mounted directly at the court
- Streaming Camera(s) – deliver the live video feed of your game. Up to two cameras can be installed per court (HD and 4K resolution available)
- Dual Tracking Camera – the tracking cameras that capture game data in real time
Overview Padel
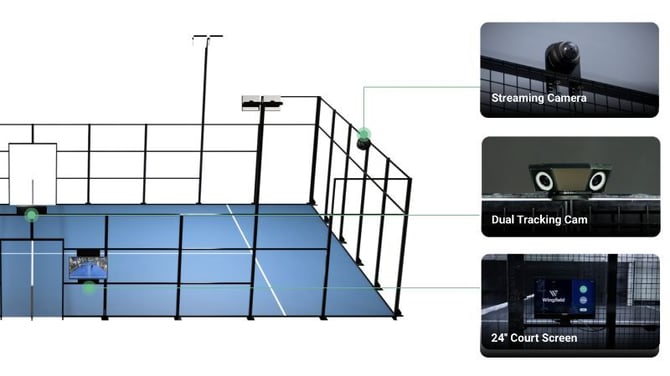
Sample Installation option for Padel.
Overview Pickleball & Tennis
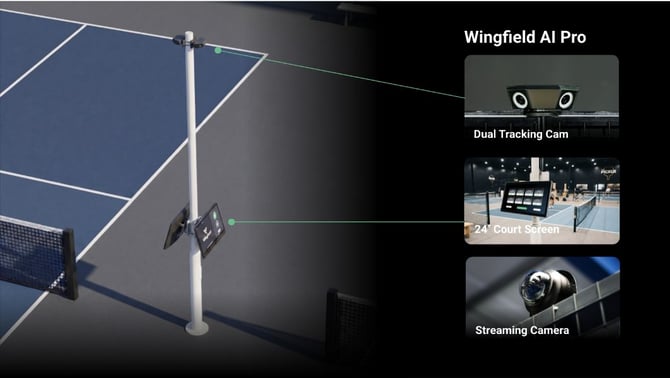
Sample Installation option using our standard Pole Solution for two adjacent courts (for Pickleball or Tennis)
What are the technical requirements for Wingfield AI Pro?
We keep it simple. To operate Wingfield AI Pro, all you need is:
- ⚡ Power: A 230V/120V power outlet directly at the court.
- 🛜 Internet (LAN/WLAN): A stable internet connection with at least 5 Mbit/s.
💡 Tip: Since video data is uploaded, your upload speed in particular affects how quickly your recordings become available in the app afterwards. Depending on the speed and stability of your Wi-Fi, it may be worth running a LAN connection to the router instead. The screen at the court itself displays all data and video without delay.
How do I wire my Wingfield AI Pro court?
Here's the standard wiring setup for a Wingfield AI Pro court.
- The Streaming Cameras are connected to the PoE switch via network cable
- On AI Pro setups, the DCM connects directly to the DCM port on the Court Terminal display — not through the PoE switch
- The Court Terminal connects the switch, DCM, and power supply at its back
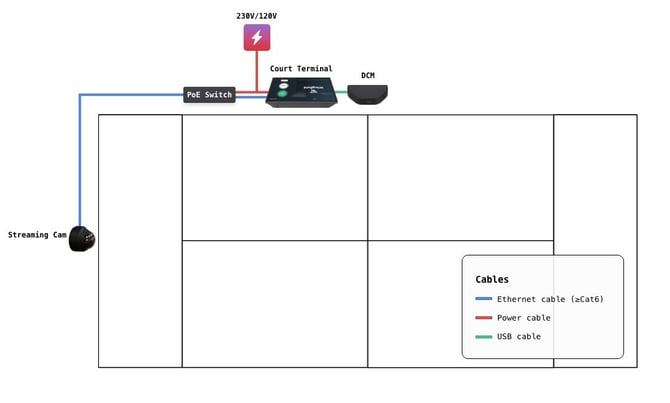
☝🏻 By the way: The PoE switch shown is typically mounted in the included bracket behind your Court Terminal.
⚠️ Caution: If you're installing multiple systems side by side (especially relevant for tennis or pickleball courts), a different wiring layout may make more sense. Talk to our installation support team about this.
What's included in the Wingfield AI Pro scope of delivery?
| Components | Included parts |
|
Court Terminal |
Standard component:
Optional mounting kits (all incl. screws):
|
|
Streaming Camera |
Standard components
Optional mounting kits (all incl. screws):
|
|
Dual Tracking Camera |
Standard components
|
|
Power cables |
🇪🇺 Europe:
🌍 Rest of the world:
|
| Network cables |
Standard components
|
💡 Tip: You don't need to create your wiring plan yourself. Our installation support team is happy to walk through your individual court setup with you beforehand.
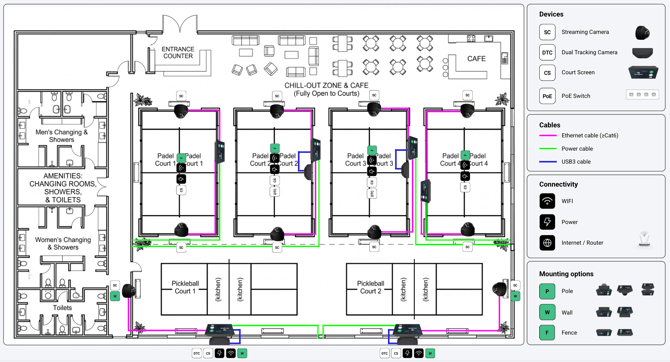
Installation guides for Wingfield AI Pro
Once preparation is complete, it's time for the actual mounting. The installation steps for the three components are largely identical across all sports — sport-specific details are noted in the respective prep articles.
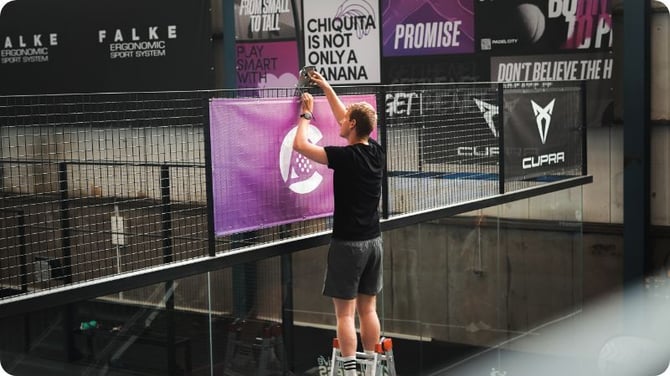
An overview of the individual installation steps
- Choose the optimal court: Consider these factors when selecting your court (🔗 view article)
- Install the Dual Tracking Camera: Start by mounting your tracking unit
- Mount the Court Terminal: Attach your Court Terminal
- Mount the Streaming Camera: Continue with your cameras
- Configure the Streaming Camera: Connect your cameras to the Court Terminal (🔗 view article)
- Calibrate the Dual Tracking Camera: Align the tracking cameras at your court (🔗 view article)
Required tools and materials
Below you'll find a list of the tools and materials required for the installation.
| Tool/Material | Description |
| Hex key or hex bits (sizes 3, 4, 5, 6) | For mounting the touchscreen |
| Cordless screwdriver (optional) | For permanently mounting the camera |
| Utility knife | For trimming and removing cable ties |
| Ladder or lift platform | For safe access to the mounting height |
| Spirit level (optional) | Depending on the mounting option chosen |
| Hammer drill (optional) | Depending on the mounting option chosen |
Important safety notes
Please read this section carefully before starting the installation. Failing to follow these notes can result in injury, damage to the product, or loss of warranty.
-
Make sure the mounting location (e.g. fence post, beam, padel court structure) is stable and can safely bear the weight of the Wingfield Cam+ unit and its components.
-
Fully disconnect the power supply to the court or installation area before mounting any electrical components.
-
Dispose of all packaging materials properly and in an environmentally responsible way.
Book your installation meeting now:
Let's plan your installation together. Book an appointment with our technical support team using the link below.
🗓️ Schedule an installation meeting: click here
📞 Service hotline: 🇺🇸 +1 929 395 1078 | 🇪🇺 +49 511 51525901
💬 WhatsApp: click here
📨 E-Mail: service@wingfield.io