In Freeplay mode, you can play completely free. All analyses in this playing mode focus on your shots. As in Match and Drill mode, you will receive the standard analyses of your shots, divided into placement, speed, and height categories. In addition to our general recommendations for good tracking, you don't need to pay attention to anything else.
⚠️ Attention: At the beginning and throughout the session, ensure that you are logged in to the side of the court you are actually playing at. You can make adjustments at any time using the side change button.
When does Freeplay make the most sense?
- You don't want to play for points and, therefore, don't want to have to stick to the general match rules (like in match mode).
- You want to play exercises that cannot be reproduced with the drill mode.
- For example, you may want to leave Wingfield "running" for an entire session to track your activities.
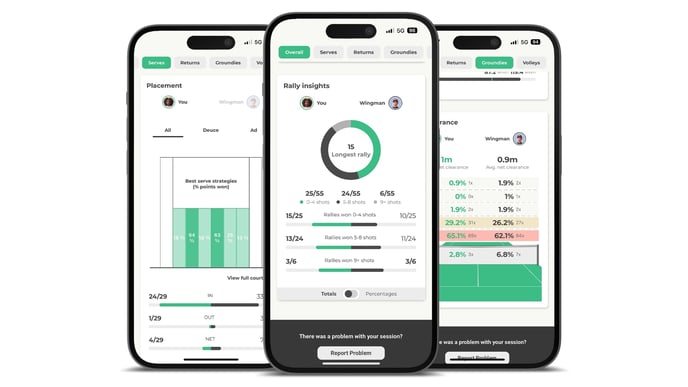
You get these stats in Freeplay mode.
After your Freeplay session, you can access various statistics in the Wingfield app to check whether you have achieved your exercise goals. You will soon realize that you often notice things in retrospect that you would otherwise not have paid any attention to during the game.
You can find in-depth Head-2-Head statistics for the different types of shots in the Serves, Returns, Groundies, and Volleys tabs. To help you find your way around quickly, the structure of the respective shot analyses always follows the usual pattern:
Shot placement

Glancing at the placement map, you can see which shots caused you the most problems today. The placement analysis also reveals these exemplary things:
- Which shot was the most error-prone? What percentage of my backhands went out of bounds?
- Did I have a good length in my backhands in a rhythm exercise? What percentage of my backhands went into the last third/close to the baseline?
- Did I manage to play all my forehands into the field?
- Was I able to minimize the spread in a braces exercise?
- Did I have a good hitting position for my shots, and didn't I stand not too far behind the baseline?
- ...
💡Tip: Click on View full court to see each shot's impact points (incl. shot position and speeds) and display selected shots directly in the video.
Net Clearance
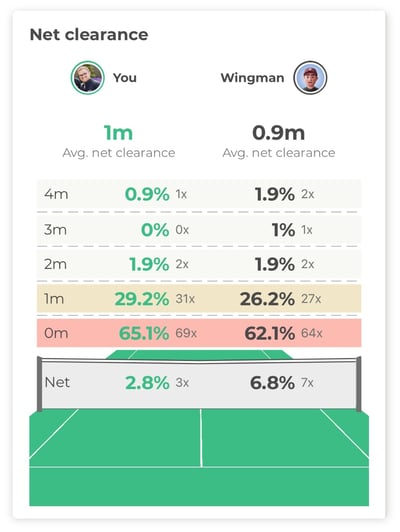
Having a good height above the net naturally goes hand in hand with a lower risk of hitting many balls into the net. On the other hand, it can also indicate a good length in your shots to challenge the opponents and push them into defensive positions. Use the height map for the following things, for example:
- Minimize the number of shots per round that go into the red or yellow zone or even the net.
- Visualize the effects of changing the grip on the shot heights.
- ...
Shot speeds
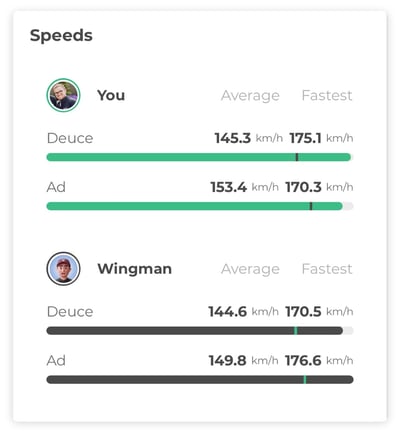
Of course, every player is keen to see how hard they can hit their shots in the first place. However, the speed values can also be used in a more meaningful context. These are exemplary applications:
- Could I improve my maximum speed during my serve training or at least reach my desired target range?
- Was I able to reach my desired target range in a rhythm exercise with the average speed of my forehands?
- ...
Analyze shot technique in the Video player
Especially when analyzing technique, it can be particularly valuable to see yourself hitting or playing. You can pay attention to this, for example:
- How do I position myself to the ball?
- Is the timing of my swing right?
- Do I go through the ball when I hit it?
- What does my ball toss look like when I serve? Where is my impact point?...
💡Tip: Use the slow motion function to analyze your technique frame by frame.